How to Setup Omni-channel in Salesforce Lightning
To enable Omni-Channel navigate to the Setup menu in Salesforce. Type in "Omni" in the quick find bar in the upper left, and then click Omni-Channel Settings. Click to check the Enable Omni-Channel checkbox and click Save.
Note: You have the option to use queue-based or skill-based routing. More on that later.

Create Service Channels
Next, navigate to Service Channels and click New. Then name your Service Channel and choose its corresponding object. This step might be confusing because you might think that each object in Salesforce doesn't correspond to an object directly. For example, the Case object in Salesforce might come from many different channels such as a web form (via Web-to-Case), email, or the help portal. For the purposes of Omni-Channel these will all be considered as part of the "Case" Service Channel, or whatever you would like to name it. Later, we can setup different queues for each source the lead is coming from such as Web Form Queue and Email Queue.
If you're using a custom object and would like to route those records via Omni-Channel you can setup a Service Channel for it here as well.

Create Omni-Channel Presence Statuses
Next we can create Presence Statuses. These are the statuses that will be available for agents to select when they login to Salesforce Omni-Channel. It's important to understand your business requirements and the composition of your agents prior to completing this step. You may have some agents who handle only chats, others who handle only cases, and others who handle both chats and cases.
To create a new Presence Status click the New button.

Next, name the presence status. Then select which Service Channels you want to be assigned to this Presence Status. This doesn't mean that every agent who has this status will receive all types of chats or cases. We'll assign agents to chat and/or case queues in the next step. However, it is necessary for an agent to have an available status for the type or types of channels they'll be handling. You can also create a "busy" status to track the break time of your agents for reporting purposes.
Finally, click Save.
Create the Routing & Presence Configurations
Navigate to Routing Configurations. This is the area where you will size records that Omni-Channel will routing, as well as, specify the manner in which they are routed. The sizing of records is a bit arbitrary because whether a record is routed depends on both the size of the item and the agent's capacity. You have the option to size work items in whole unit terms (1, 2, 3, etc) or in percentage terms. While creating the Routing Configuration you have the option to specify how records should be routed by choosing the Routing Model. Your options are: Least Active, Most Available, and External Routing. You can read more on the Routing Models here.

Click Save.
Next navigate to Presence Configurations. Click New. There are a number of fields you need to fill in for the Presence Configuration. After naming it, you need to enter the Capacity. This the capacity that the agent get assigned. Note that an agent must have a capacity great than or equal to the size of a queued work item; otherwise they won't be routed any work.

For a common situation where an agent handles chats and cases you might consider giving them a Presence Configuration with a capacity of 2. You would size both chats and cases as 1 unit, but prioritize chat queues higher than case queues (you would do this by assigning a Routing Configuration with priority of 1 to chat queues and a different Routing Configuration with a priority of 2 to your case queues).
The Presence Configuration has a number of additional options. For instance you can give agents the option to accept a work item or have that item pushed to them automatically. If you give agents an option to accept, but the request times out you can also set put the agent in an Away Presence Status so they are not routed additional items.
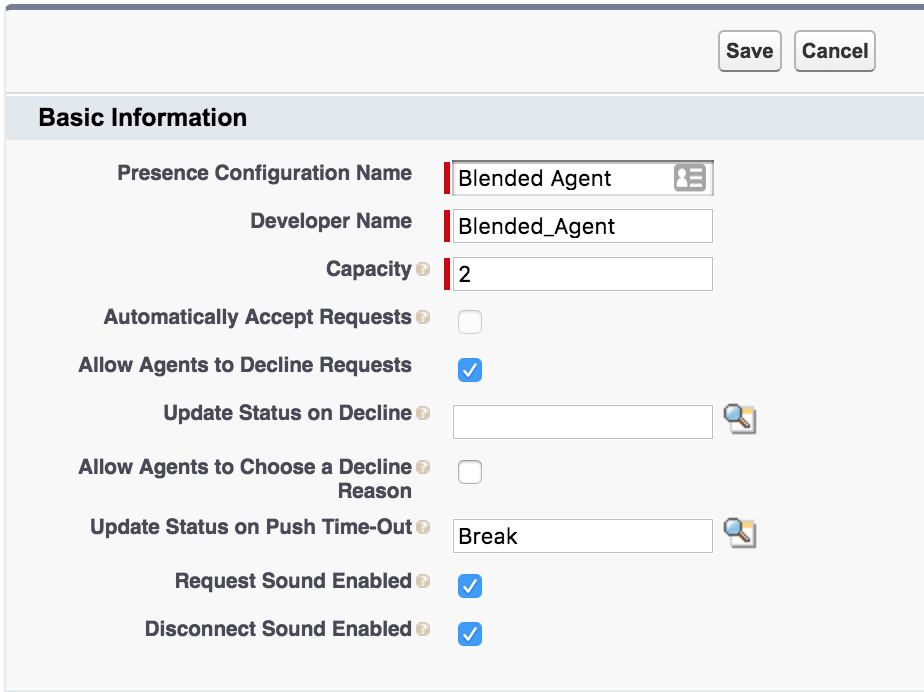
While creating a Presence Configuration you can also add agents individually or by profile. Note you can come back to edit the Presence Configuration and add your agents at a later time as well.
Create Queues and Assign them Routing Configurations
Type in queue into the quick find in the upper left while in the Setup menu. Click Queues. Click New. Name your queue, and assign a Routing Configuration. If you are implementing the chat and case use case mentioned above select your chat Routing Configuration with the highest priority in the Routing Configuration section, and in the Supported Objects section choose Live Chat Transcript.
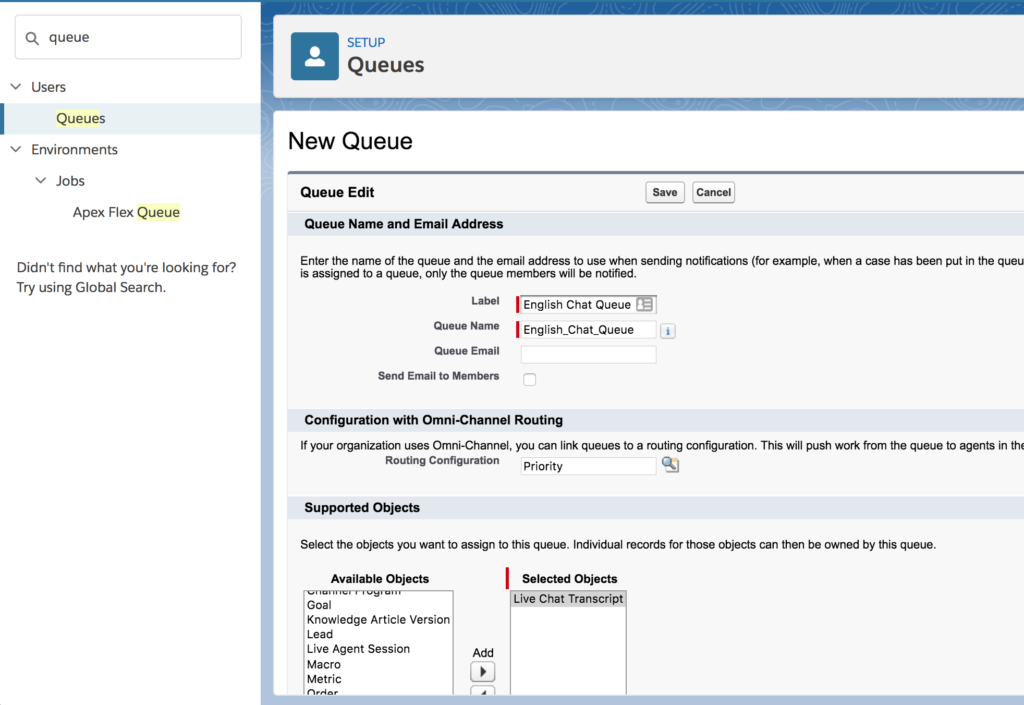
At this time you can add your agents to the queue or you can edit the queue at a later time. You have the option to add agents individually, by role, or by group.
Add Omni-Channel to the Utility Bar in the Lightning App
Lastly you'll need to ensure that Omni-Channel has been added to the utility bar of your Service Cloud application, so that agents can log in to Omni-Channel and receive work! Type in App into the quick find in the Setup menu in the upper left. Then select App Manager.

Scroll to your app, click the dropdown arrow on the far right and click Edit. Click Utility Bar under App Settings, and then click the Add button to the right of the Utility Bar Items.
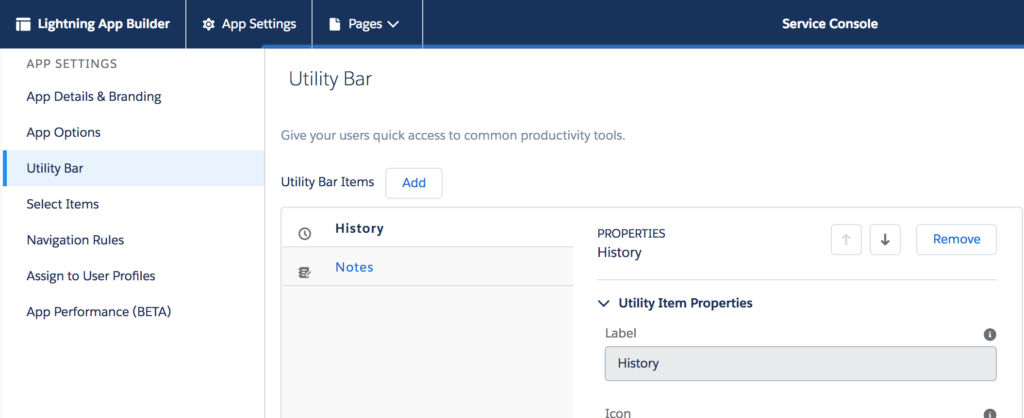
Choose Omni-Channel and click Save.

Finalize the Agent Setup by Granting them Access to Presence Statuses
Create a permission set or go to the Profile for your agents to enable the Omni-Channel Presence Statuses for them. Type in Profile in the Setup quick find, and click Profiles. Click on the Profile you want to add the Presence Statuses to (do not click edit, click the Profile Name).
You can hover over the Enabled Service Presence Status Access link, and then click Edit.

Add the relevant Presence Statuses to Enabled Service Presence Statuses column, and click Save.

Change the Routing on Chat Buttons to Omni-Channel
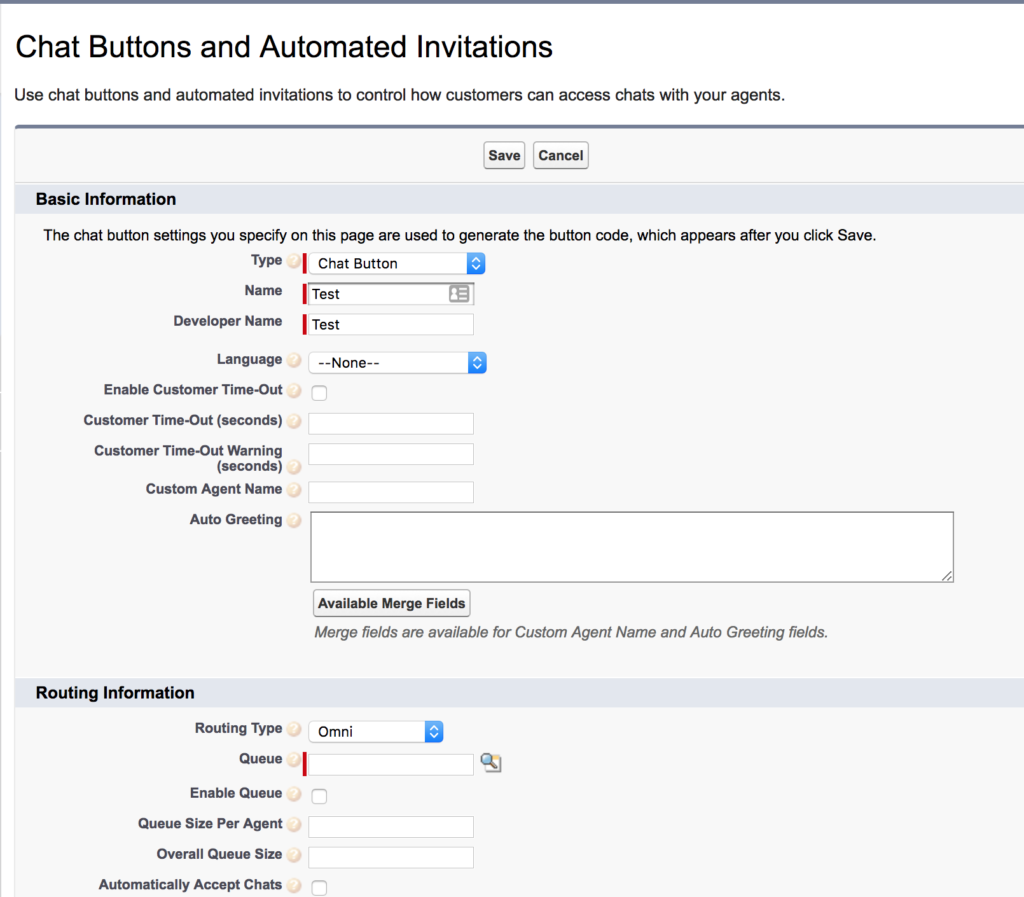
Next switch the Salesforce Classic and go to the Setup menu. At the time of writing Live Agent cannot be managed in Salesforce Lightning. In the quick find type in Live Agent, scroll down and select Chat Buttons & Invitations. Click Edit on your chat button, and change Routing Type to Omni. Fill in the new required Queue field with the queue that you want this chat button to forward chats to. Click Save.
Voila! You've setup Salesforce Omni-Channel! As a final reminder make sure your agent has the 'Live Agent User' checkbox checked on their user account.